> ## Documentation Index
> Fetch the complete documentation index at: https://docs.dash360.com/llms.txt
> Use this file to discover all available pages before exploring further.
# Quick Status
> A streamlined grid for CAMs to update actual/expected dates and percent complete for their assigned activities, then submit those changes to an administrator for review and approval.
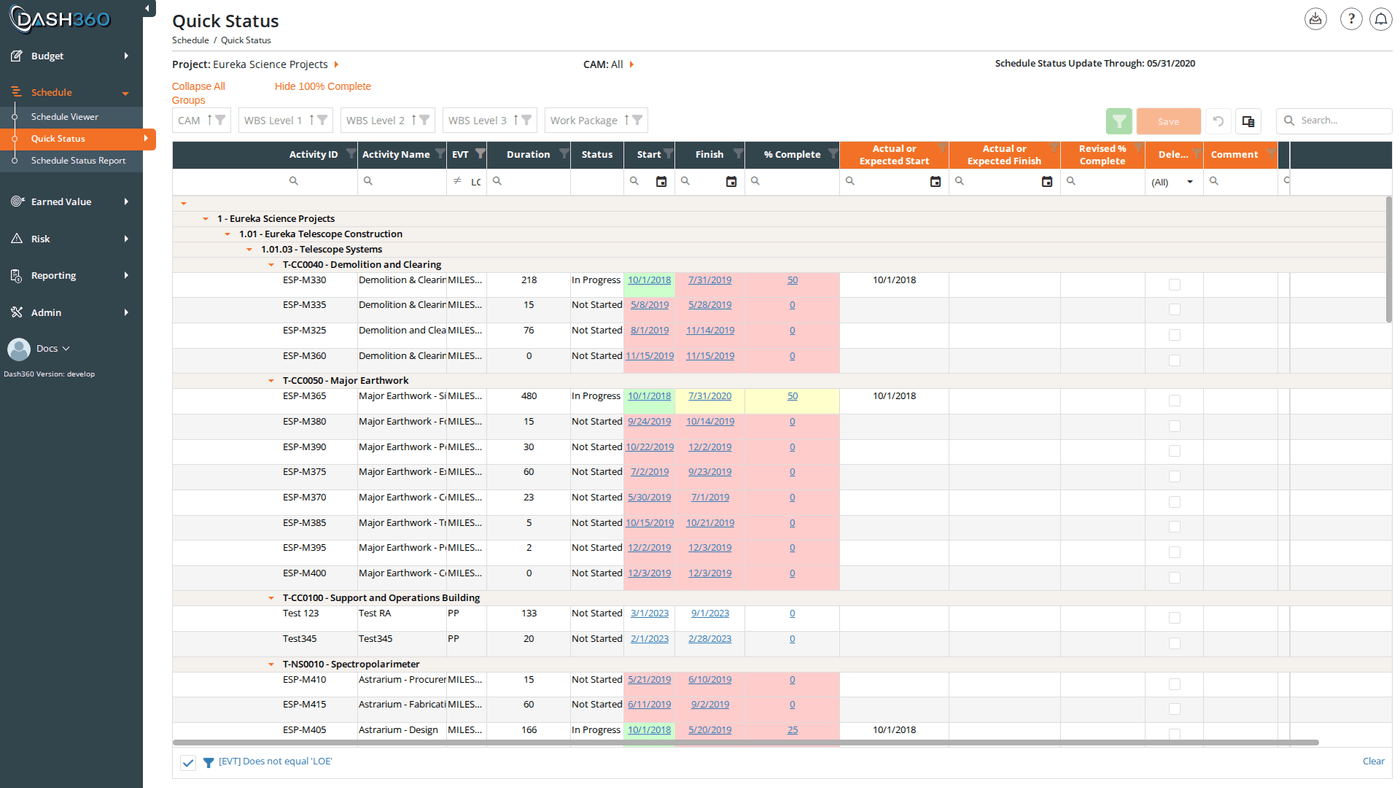 ## Overview
Quick Status is the primary way Control Account Managers submit schedule updates. It displays activities assigned to your work packages with color-coded status indicators, and lets you enter revised dates and percent complete directly in the grid. When you are done, you save your changes and submit them to your administrator for review and approval. Once approved, those changes are written back into the live schedule.
**URL:** `/Schedule/QuickStatus/Index`
## Prerequisites
* Select a **project** and **CAM** from the inline filters in the page header.
* You must have Schedule access for at least one work package in the selected project.
***
## Page Layout
The page header contains two inline filters: **Project** and **CAM**. Once a CAM is selected, the **Schedule Status Update Through: \[date]** label appears in the header, showing the cut-off date for this update cycle.
Above the grid, two quick-action links are available:
* **Expand All Groups / Collapse All Groups**: toggles all WBS group rows at once
* **Hide 100% Complete / Show 100% Complete**: hides or shows activities already at 100%
***
## Reading the Grid
### Grouping
Activities are grouped by **CAM**, then **WBS Level 1**, **WBS Level 2**, and **WBS Level 3** by default, then by **Work Package**. Expand or collapse groups by clicking the group row or using the Expand/Collapse link above the grid.
### Default Filter
On first load with a system view, Level of Effort (**LOE**) activities are automatically filtered out. Only measurable activities requiring status updates are shown.
### Color-Coded Cells
Three read-only columns use background color to signal status at a glance:
**Start column:**
| Color | Meaning |
| -------- | ----------------------------------------------------------------------------- |
| Red | Activity was scheduled to start, but % Complete is still 0; it hasn't started |
| Green | Activity has started (% Complete > 0 and status date ≥ scheduled start) |
| No color | Activity is not yet due to start |
**Finish column:**
| Color | Meaning |
| -------- | --------------------------------------------------------------------------------------- |
| Green | Activity is 100% complete |
| Yellow | Activity is in progress and scheduled to finish in the current status period |
| Red | Activity is overdue: less than 100% complete but finish date has passed the status date |
| No color | Activity has not yet reached its finish period |
**% Complete column:**
| Color | Meaning |
| -------- | ------------------------------------------------------------------------ |
| Green | 100% complete |
| Yellow | In progress (>0% and \<100%) |
| Red | Overdue: less than 100% complete but finish date is past the status date |
| No color | Not yet started |
### Columns
**Editable columns** (shown with an orange column header):
| Column | What to Enter |
| ----------------------------- | --------------------------------------------------------------------------------------------------------------------------------------------- |
| **Actual or Expected Start** | The actual start date if the activity has started, or the expected start date if it hasn't yet |
| **Actual or Expected Finish** | The actual finish date if complete, or the expected finish date |
| **Revised % Complete** | Current percent complete (0–100). Read-only if the activity has Activity Steps; percent is driven by step completion instead |
| **Delete** | Check this box to flag the activity for deletion from the schedule. Checking it strikes through the row and clears the Actual/Expected fields |
| **Comment** | Notes for the administrator explaining your changes |
**Read-only columns** (for reference):
| Column | Description |
| -------------------- | ------------------------------------------------------------------------------------ |
| **Activity ID** | The activity's identifier in the schedule |
| **Activity Name** | Activity description |
| **EVT** | Earned Value Technique for the activity |
| **Duration** | Current scheduled duration |
| **Status** | Calculated: Not Started / In Progress / Complete based on % complete and status date |
| **Start** | Originally scheduled start date |
| **Finish** | Originally scheduled finish date |
| **% Complete** | Current percent complete from the last approved update |
| **Revised Duration** | Duration as revised |
| **Work Package** | Work package the activity belongs to |
**Hidden columns** (available via the column chooser):
WBS Level 1–9, WBS Number, WBS Description, Work Package Number, Work Package Description, # of Activity Steps, Work Package Weight, custom fields, and notebook category columns.
***
## Entering Status Updates
### Quick-Entry Shortcuts
Clicking the read-only **Start** cell copies the scheduled start date directly into **Actual or Expected Start**, giving you a starting point to edit. The same applies to the **Finish** cell → **Actual or Expected Finish**, and **% Complete** → **Revised % Complete**. This saves typing when the scheduled date is close to the actual date.
### Auto-Populate on 100% Complete
When you enter **100** in **Revised % Complete** and move to the next cell, the grid automatically fills in the Actual Start and Actual Finish dates from the scheduled dates if those fields are empty.
### Fill Down (Ctrl + Drag)
To apply the same value to multiple consecutive rows:
1. Hold **Ctrl**. Small triangle handles appear in the lower-right corner of each editable cell.
2. Click and drag the triangle handle downward across the rows you want to fill.
3. Release to apply the value from the starting cell to all rows in the dragged range.
This is useful for quickly setting the same date or percent complete across a group of related activities.
### Marking an Activity for Deletion
Check the **Delete** checkbox on any row to flag that activity for deletion from the schedule. The row displays with strikethrough text and the Actual/Expected date fields are cleared. The deletion is part of the submission and takes effect only after administrator approval.
***
## Activity Steps
If Activity Steps are enabled for the project, a **Steps** button appears in the row actions column. Click it to open the **Activity Steps** modal for that activity.
### Activity Steps Modal
The modal shows two sets of columns side by side; the current baseline values (read-only) and the revised values you can edit:
**Read-only (baseline):**
| Column | Description |
| -------------------- | ------------------------------------------------------ |
| **Step ID** | The step identifier |
| **Step Description** | Description of the step |
| **Weight** | The step's weight used to calculate overall % complete |
| **% Complete** | Current completion percentage for this step |
**Editable:**
| Column | Description |
| ---------------------------- | ------------------------------------------------ |
| **Revised Step ID** | Updated step identifier |
| **Revised Step Description** | Updated description |
| **Revised Weight** | Updated weight |
| **Revised % Complete** | Your updated completion percentage for this step |
Clicking a read-only cell copies its value into the corresponding Revised field for quick editing.
**Adding a step:** Click **Add Row** to insert a new step. Fill in the Revised Step ID, Revised Step Description, Revised Weight, and Revised % Complete for the new step.
**Deleting a step:** Check the delete option on a step row. The step displays with strikethrough text.
Step percentages and weights roll up to calculate the activity's overall **Revised % Complete** on the main grid.
***
## Validation Rules
Dash360 enforces validation rules when you save. If any rule is violated, an error message appears and no data is saved until all errors are corrected. Columns with errors display a red outline with an orange background.
The rules are configurable by your administrator (some may be turned off for your project). Key rules include:
| Situation | What is Required |
| ----------------------------------------------------- | ----------------------------------------------- |
| Activity already had a % complete in a prior period | Revised Start must be provided |
| Activity was scheduled to start this month or earlier | Revised Start must be provided |
| Activity already had a % complete in a prior period | Revised Finish must be provided |
| Activity was scheduled to start or finish this period | Revised Finish must be provided |
| Actual Finish date entered | Must be on or after the Actual Start date |
| Actual Finish is before the status date | Revised % Complete must be 100% |
| Actual Start is after the status date | Revised % Complete must be 0% |
| Revised % Complete is 100% | Actual Finish must not be after the status date |
| All date fields | Year must be 2000 or later |
If a rule fires, a message describes exactly what is required. Contact your administrator if a rule prevents a valid update; rules can be adjusted in **Admin > Quick Status Rules**.
***
## Saving and Submitting
When your updates are complete, click **Save** in the grid toolbar.
### Auto-Send (if enabled)
If the project is configured for automatic submission, your changes are immediately sent to the administrator without any further steps. A success message confirms they have been sent.
### Review and Send to Admin (standard flow)
If auto-send is not enabled, the **Send Quick Status to Admin for Approval** modal opens. It shows all of your pending updates in a review grid with the following columns:
| Column | Description |
| -------------------------------- | ---------------------------------------------- |
| **Updated By** | User who entered the update |
| **WBS / WBS Name** | WBS element for the activity |
| **Activity ID / Description** | The activity being updated |
| **Activity Duration** | Scheduled duration |
| **Start / Finish** | Original scheduled dates |
| **% Complete** | Current percent complete |
| **Actual or Expected Start** | Your revised start date |
| **Actual or Expected Finish** | Your revised finish date |
| **Revised % Complete** | Your revised % complete |
| **Delete Activity** | Whether the activity is flagged for deletion |
| **Comments** | Your comment |
| **Work Package / Name** | Work package the activity belongs to |
| **Added / Removed Predecessors** | Dependency changes |
| **Added / Removed Successors** | Dependency changes |
| **Schedule Status Date** | The cut-off date for this update |
| **Last Updated** | When this update was last modified |
| **Sent to Admin** | Whether this update has already been submitted |
| **Approved** | Whether this update has been approved |
You can delete individual entries from the modal grid before sending if you change your mind about a specific activity.
Click **Send to Admin** to submit all listed updates. The updates are sent to **Schedule > Schedule Status Updates** where your administrator reviews and approves them.
Submitted changes do not appear in the live schedule until an administrator approves them in Schedule Status Updates.
***
## Withdrawing a Pending Update
If you need to withdraw an update that has been submitted but not yet approved, locate the row in Quick Status and click **Delete Status** in the row actions. This removes the pending submission. You can then re-enter corrected values and resubmit.
If the deletion was accidental, click **Restore Status** to bring the pending update back.
***
## Saved Views
Quick Status supports named saved views that preserve your column layout, grouping, filters, and sort settings. A System View loads by default.
When viewing a system view, the message "Currently viewing a system view. Changes will not be saved." appears at the top right of the grid.
***
## Grid Features
| Feature | Description |
| ------------------------------ | ---------------------------------------------------------------------------------------- |
| **Expand/Collapse All Groups** | Link above grid. Toggles all group rows at once. |
| **Hide/Show 100% Complete** | Link above grid. Filters out or shows back all activities at 100%. |
| **Column chooser** | Add hidden columns: WBS levels, custom fields, notebook categories, Work Package Weight. |
| **Search panel** | Free-text search across all visible columns |
| **Filter row** | Per-column filter inputs; click **Apply Filters** to apply |
| **Header filter** | Click any column header for value-based filtering |
| **Filter panel** | Shows active filter criteria and allows clearing them |
| **Group panel** | Drag columns to add additional grouping levels |
| **Context menu** | Right-click a group row to expand or collapse it individually |
***
## Exporting
Click the **Download** icon and select **Export to Excel** to download the current grid view to Excel.
***
## Overview
Quick Status is the primary way Control Account Managers submit schedule updates. It displays activities assigned to your work packages with color-coded status indicators, and lets you enter revised dates and percent complete directly in the grid. When you are done, you save your changes and submit them to your administrator for review and approval. Once approved, those changes are written back into the live schedule.
**URL:** `/Schedule/QuickStatus/Index`
## Prerequisites
* Select a **project** and **CAM** from the inline filters in the page header.
* You must have Schedule access for at least one work package in the selected project.
***
## Page Layout
The page header contains two inline filters: **Project** and **CAM**. Once a CAM is selected, the **Schedule Status Update Through: \[date]** label appears in the header, showing the cut-off date for this update cycle.
Above the grid, two quick-action links are available:
* **Expand All Groups / Collapse All Groups**: toggles all WBS group rows at once
* **Hide 100% Complete / Show 100% Complete**: hides or shows activities already at 100%
***
## Reading the Grid
### Grouping
Activities are grouped by **CAM**, then **WBS Level 1**, **WBS Level 2**, and **WBS Level 3** by default, then by **Work Package**. Expand or collapse groups by clicking the group row or using the Expand/Collapse link above the grid.
### Default Filter
On first load with a system view, Level of Effort (**LOE**) activities are automatically filtered out. Only measurable activities requiring status updates are shown.
### Color-Coded Cells
Three read-only columns use background color to signal status at a glance:
**Start column:**
| Color | Meaning |
| -------- | ----------------------------------------------------------------------------- |
| Red | Activity was scheduled to start, but % Complete is still 0; it hasn't started |
| Green | Activity has started (% Complete > 0 and status date ≥ scheduled start) |
| No color | Activity is not yet due to start |
**Finish column:**
| Color | Meaning |
| -------- | --------------------------------------------------------------------------------------- |
| Green | Activity is 100% complete |
| Yellow | Activity is in progress and scheduled to finish in the current status period |
| Red | Activity is overdue: less than 100% complete but finish date has passed the status date |
| No color | Activity has not yet reached its finish period |
**% Complete column:**
| Color | Meaning |
| -------- | ------------------------------------------------------------------------ |
| Green | 100% complete |
| Yellow | In progress (>0% and \<100%) |
| Red | Overdue: less than 100% complete but finish date is past the status date |
| No color | Not yet started |
### Columns
**Editable columns** (shown with an orange column header):
| Column | What to Enter |
| ----------------------------- | --------------------------------------------------------------------------------------------------------------------------------------------- |
| **Actual or Expected Start** | The actual start date if the activity has started, or the expected start date if it hasn't yet |
| **Actual or Expected Finish** | The actual finish date if complete, or the expected finish date |
| **Revised % Complete** | Current percent complete (0–100). Read-only if the activity has Activity Steps; percent is driven by step completion instead |
| **Delete** | Check this box to flag the activity for deletion from the schedule. Checking it strikes through the row and clears the Actual/Expected fields |
| **Comment** | Notes for the administrator explaining your changes |
**Read-only columns** (for reference):
| Column | Description |
| -------------------- | ------------------------------------------------------------------------------------ |
| **Activity ID** | The activity's identifier in the schedule |
| **Activity Name** | Activity description |
| **EVT** | Earned Value Technique for the activity |
| **Duration** | Current scheduled duration |
| **Status** | Calculated: Not Started / In Progress / Complete based on % complete and status date |
| **Start** | Originally scheduled start date |
| **Finish** | Originally scheduled finish date |
| **% Complete** | Current percent complete from the last approved update |
| **Revised Duration** | Duration as revised |
| **Work Package** | Work package the activity belongs to |
**Hidden columns** (available via the column chooser):
WBS Level 1–9, WBS Number, WBS Description, Work Package Number, Work Package Description, # of Activity Steps, Work Package Weight, custom fields, and notebook category columns.
***
## Entering Status Updates
### Quick-Entry Shortcuts
Clicking the read-only **Start** cell copies the scheduled start date directly into **Actual or Expected Start**, giving you a starting point to edit. The same applies to the **Finish** cell → **Actual or Expected Finish**, and **% Complete** → **Revised % Complete**. This saves typing when the scheduled date is close to the actual date.
### Auto-Populate on 100% Complete
When you enter **100** in **Revised % Complete** and move to the next cell, the grid automatically fills in the Actual Start and Actual Finish dates from the scheduled dates if those fields are empty.
### Fill Down (Ctrl + Drag)
To apply the same value to multiple consecutive rows:
1. Hold **Ctrl**. Small triangle handles appear in the lower-right corner of each editable cell.
2. Click and drag the triangle handle downward across the rows you want to fill.
3. Release to apply the value from the starting cell to all rows in the dragged range.
This is useful for quickly setting the same date or percent complete across a group of related activities.
### Marking an Activity for Deletion
Check the **Delete** checkbox on any row to flag that activity for deletion from the schedule. The row displays with strikethrough text and the Actual/Expected date fields are cleared. The deletion is part of the submission and takes effect only after administrator approval.
***
## Activity Steps
If Activity Steps are enabled for the project, a **Steps** button appears in the row actions column. Click it to open the **Activity Steps** modal for that activity.
### Activity Steps Modal
The modal shows two sets of columns side by side; the current baseline values (read-only) and the revised values you can edit:
**Read-only (baseline):**
| Column | Description |
| -------------------- | ------------------------------------------------------ |
| **Step ID** | The step identifier |
| **Step Description** | Description of the step |
| **Weight** | The step's weight used to calculate overall % complete |
| **% Complete** | Current completion percentage for this step |
**Editable:**
| Column | Description |
| ---------------------------- | ------------------------------------------------ |
| **Revised Step ID** | Updated step identifier |
| **Revised Step Description** | Updated description |
| **Revised Weight** | Updated weight |
| **Revised % Complete** | Your updated completion percentage for this step |
Clicking a read-only cell copies its value into the corresponding Revised field for quick editing.
**Adding a step:** Click **Add Row** to insert a new step. Fill in the Revised Step ID, Revised Step Description, Revised Weight, and Revised % Complete for the new step.
**Deleting a step:** Check the delete option on a step row. The step displays with strikethrough text.
Step percentages and weights roll up to calculate the activity's overall **Revised % Complete** on the main grid.
***
## Validation Rules
Dash360 enforces validation rules when you save. If any rule is violated, an error message appears and no data is saved until all errors are corrected. Columns with errors display a red outline with an orange background.
The rules are configurable by your administrator (some may be turned off for your project). Key rules include:
| Situation | What is Required |
| ----------------------------------------------------- | ----------------------------------------------- |
| Activity already had a % complete in a prior period | Revised Start must be provided |
| Activity was scheduled to start this month or earlier | Revised Start must be provided |
| Activity already had a % complete in a prior period | Revised Finish must be provided |
| Activity was scheduled to start or finish this period | Revised Finish must be provided |
| Actual Finish date entered | Must be on or after the Actual Start date |
| Actual Finish is before the status date | Revised % Complete must be 100% |
| Actual Start is after the status date | Revised % Complete must be 0% |
| Revised % Complete is 100% | Actual Finish must not be after the status date |
| All date fields | Year must be 2000 or later |
If a rule fires, a message describes exactly what is required. Contact your administrator if a rule prevents a valid update; rules can be adjusted in **Admin > Quick Status Rules**.
***
## Saving and Submitting
When your updates are complete, click **Save** in the grid toolbar.
### Auto-Send (if enabled)
If the project is configured for automatic submission, your changes are immediately sent to the administrator without any further steps. A success message confirms they have been sent.
### Review and Send to Admin (standard flow)
If auto-send is not enabled, the **Send Quick Status to Admin for Approval** modal opens. It shows all of your pending updates in a review grid with the following columns:
| Column | Description |
| -------------------------------- | ---------------------------------------------- |
| **Updated By** | User who entered the update |
| **WBS / WBS Name** | WBS element for the activity |
| **Activity ID / Description** | The activity being updated |
| **Activity Duration** | Scheduled duration |
| **Start / Finish** | Original scheduled dates |
| **% Complete** | Current percent complete |
| **Actual or Expected Start** | Your revised start date |
| **Actual or Expected Finish** | Your revised finish date |
| **Revised % Complete** | Your revised % complete |
| **Delete Activity** | Whether the activity is flagged for deletion |
| **Comments** | Your comment |
| **Work Package / Name** | Work package the activity belongs to |
| **Added / Removed Predecessors** | Dependency changes |
| **Added / Removed Successors** | Dependency changes |
| **Schedule Status Date** | The cut-off date for this update |
| **Last Updated** | When this update was last modified |
| **Sent to Admin** | Whether this update has already been submitted |
| **Approved** | Whether this update has been approved |
You can delete individual entries from the modal grid before sending if you change your mind about a specific activity.
Click **Send to Admin** to submit all listed updates. The updates are sent to **Schedule > Schedule Status Updates** where your administrator reviews and approves them.
Submitted changes do not appear in the live schedule until an administrator approves them in Schedule Status Updates.
***
## Withdrawing a Pending Update
If you need to withdraw an update that has been submitted but not yet approved, locate the row in Quick Status and click **Delete Status** in the row actions. This removes the pending submission. You can then re-enter corrected values and resubmit.
If the deletion was accidental, click **Restore Status** to bring the pending update back.
***
## Saved Views
Quick Status supports named saved views that preserve your column layout, grouping, filters, and sort settings. A System View loads by default.
When viewing a system view, the message "Currently viewing a system view. Changes will not be saved." appears at the top right of the grid.
***
## Grid Features
| Feature | Description |
| ------------------------------ | ---------------------------------------------------------------------------------------- |
| **Expand/Collapse All Groups** | Link above grid. Toggles all group rows at once. |
| **Hide/Show 100% Complete** | Link above grid. Filters out or shows back all activities at 100%. |
| **Column chooser** | Add hidden columns: WBS levels, custom fields, notebook categories, Work Package Weight. |
| **Search panel** | Free-text search across all visible columns |
| **Filter row** | Per-column filter inputs; click **Apply Filters** to apply |
| **Header filter** | Click any column header for value-based filtering |
| **Filter panel** | Shows active filter criteria and allows clearing them |
| **Group panel** | Drag columns to add additional grouping levels |
| **Context menu** | Right-click a group row to expand or collapse it individually |
***
## Exporting
Click the **Download** icon and select **Export to Excel** to download the current grid view to Excel.
***