

Overview
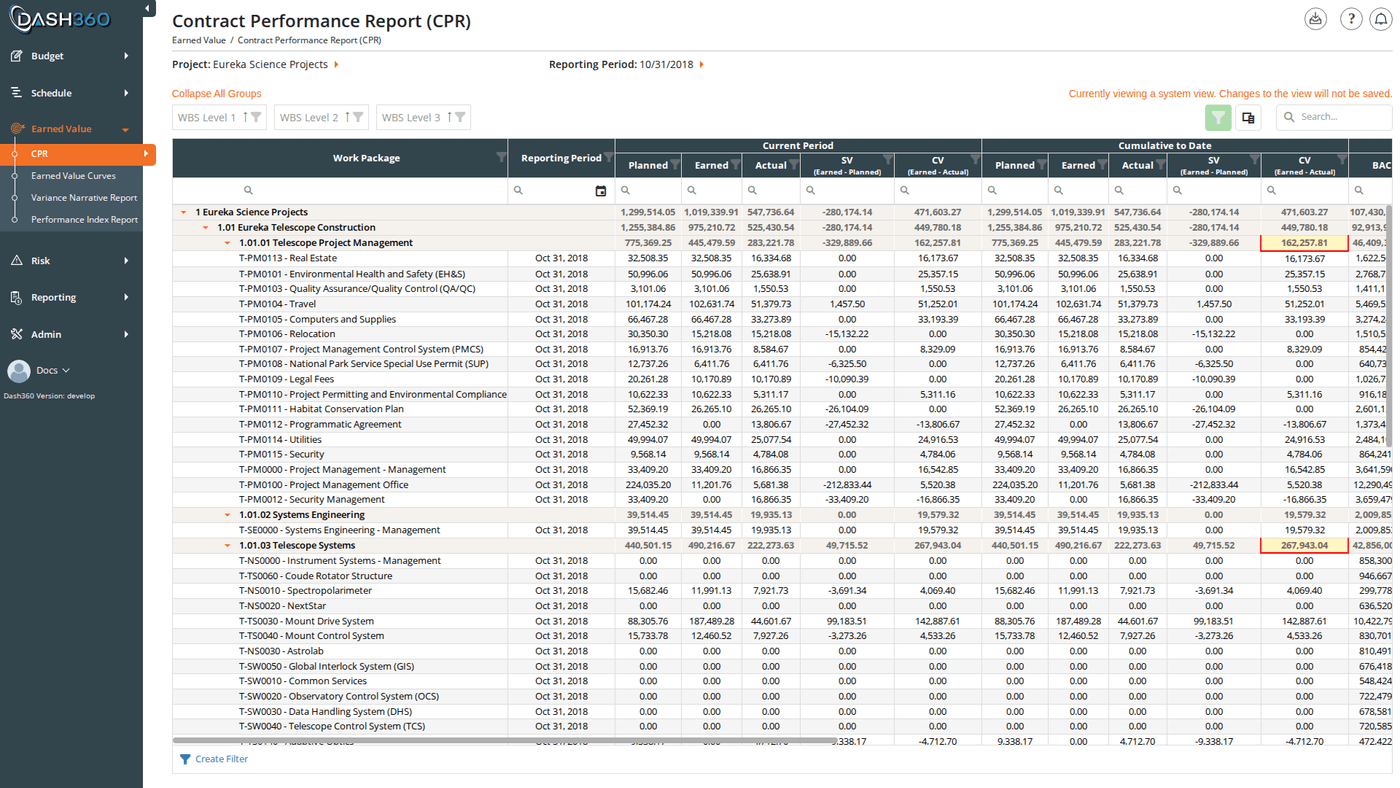
The Contract Performance Report is the primary earned value analysis tool in Dash360. It presents a hierarchical grid organized by Control Account Manager (CAM) and WBS level, showing the full set of EVM metrics (planned, earned, and actual values for both the current period and cumulative to date) along with performance indices, variances, and completion forecasts. The CPR also drives the variance narrative workflow: cells that exceed your configured thresholds are color-coded and require written explanations before the report can be finalized. URL:/EarnedValue/CPR/Index
Prerequisites
- Select a project and reporting period. The grid does not load until both are selected.
- Earned value must have been calculated for the selected reporting period. If data appears empty, contact your administrator to run the EV calculation (Admin > Projects > Calculate Earned Value).
Reading the Grid
The CPR grid is organized hierarchically. Rows roll up from work package level through WBS and CAM levels, with group summaries at each level. Variance threshold coloring applies to both data rows and group summary rows.Row Structure
Rows are grouped first by CAM, then by WBS Level 3 (default). Expand or collapse groups using the group header arrows, the Expand/Collapse All Groups link above the grid, or the right-click context menu on any group row.Column Groups
The grid is organized into the following column groups from left to right:
When the
CPRShowFormulas registry setting is enabled, each column header displays its calculation formula in smaller text below the column name (for example, SPI shows “(CTD Earned / CTD Budget)”).
Key Metric Definitions
Additional Columns
These columns are available but hidden by default. Add them via the column chooser:Variance Threshold Highlighting
Your administrator configures variance thresholds (by dollar amount, percentage, or both). The four variance cells (Current Period SV, Current Period CV, Cumulative SV, and Cumulative CV) are color-coded on both data rows and group summary rows:Red-bordered cells must have narratives written before the report period is considered complete. Cells without narratives will remain red until a narrative is saved.
Writing a Variance Narrative
Click any red-bordered or yellow-bordered SV or CV cell to open the Edit Variance Narratives modal. You can click cells on both data rows (work package level) and group summary rows (WBS level); the modal opens for that work package or WBS element.Modal Structure
The modal has two tabs:- Current Period: narratives for the current reporting period
- Cumulative to Date: narratives for cumulative performance
- A mini CPR data grid showing the EV values for the selected work package or WBS element (for context while writing)
- A Schedule Variance accordion section with the narrative fields for SV
- A Cost Variance accordion section with the narrative fields for CV
- A Comments accordion section for free-form notes
Saving
Click Save & Close to save all fields on both tabs and close the modal. The cell border turns green once a required narrative is saved. Users without edit access to this work package see the modal as read-only; the Save button is hidden.Previous Period Narratives
Within the narrative modal, you can view the narrative history for the same work package from prior periods. Click the link to open the Previous Period Variance Narrative Entries table, which shows each prior narrative with: Snapshot, Reporting Period, Field, Previous Value, Last Updated, and an action to copy a prior entry into the current fields.CPR Filters
The CPR filter panel appears in the left-side flyout after a project and reporting period are selected. It contains two sections:Variance Narratives
Currency Format
Override the display divisor for this session:Available Filters
The inline filters appear across the top of the page.
The WBS, Work Package, and CAM filters are available as secondary filters to narrow the grid view after the grid loads.
Grid Features
Request Variance Narratives Mode
This feature is visible to administrators only.
- Normal mode (unchecked): clicking an SV or CV cell opens the variance narrative modal to write an explanation.
- Request mode (checked): clicking an SV or CV cell toggles a yellow flag on that cell instead of opening the narrative modal. Use this to mark cells for review without writing a narrative yourself; the yellow flag signals to CAMs that a narrative is required for that cell.
Saved Views
The CPR supports named saved views that preserve your column layout, filters, sorts, and grouping. A System View is loaded by default.When you are viewing a system view (rather than one of your own saved views), the message “Currently viewing a system view. Changes to the view will not be saved.” appears at the top right of the grid.
- User views are saved per-user and visible only to you.
- System views are created by administrators and available to all users.
Exporting
Click the Download icon in the top right for export options.Export to Excel
Exports the full CPR grid exactly as currently displayed (including your column layout, grouping, and filters) toCPRExport.xlsx.
Export to PDF
Renders the CPR grid as a PDF, laid out for print rather than as a screenshot of the grid: wide grids are split across column groups so every figure stays legible, and the cover page records the project, the reporting period, the view and how the numbers are denominated. The PDF is rendered on the server by the same engine that produces the Site Shutdown Report, so a report exported from this screen and the same report inside that document are one implementation rather than two that drift apart. The export respects the filters currently applied to the screen. A PDF taken from a filtered screen covers what is on the screen, not the whole project.Export CPR Formats
Click Export CPR Formats to open the CPR Formats modal. Select a Type from the dropdown and configure the options for that format, then click Export CPR Report.
Each format exports to an
.xlsx file named after the format (e.g., cpr_format_1.xlsx).
Format 2 and Format 4 require an OBS file to be configured for the project. If OBS is not set up, the Export button is disabled and a warning appears. Contact your administrator to configure the OBS file under Admin > Projects.
Format 5 requires at least one variance narrative entry to exist for the selected project and reporting period. If no entries exist, the Export button is disabled.