Overview
The Users admin page is where administrators create and manage user accounts, assign roles, and control what data each user can access. Dash360 has two roles (Administrator and CAM) and supports granular access control down to the work package and resource code level.Permissions
Administrator role required for all operations on this page.User Roles
Active vs. Inactive Users
The page displays two tabs: Active and Inactive. Each tab has its own grid. Deactivating a user prevents them from logging in without deleting their record or history. Reactivate them at any time to restore access.Active Users Grid
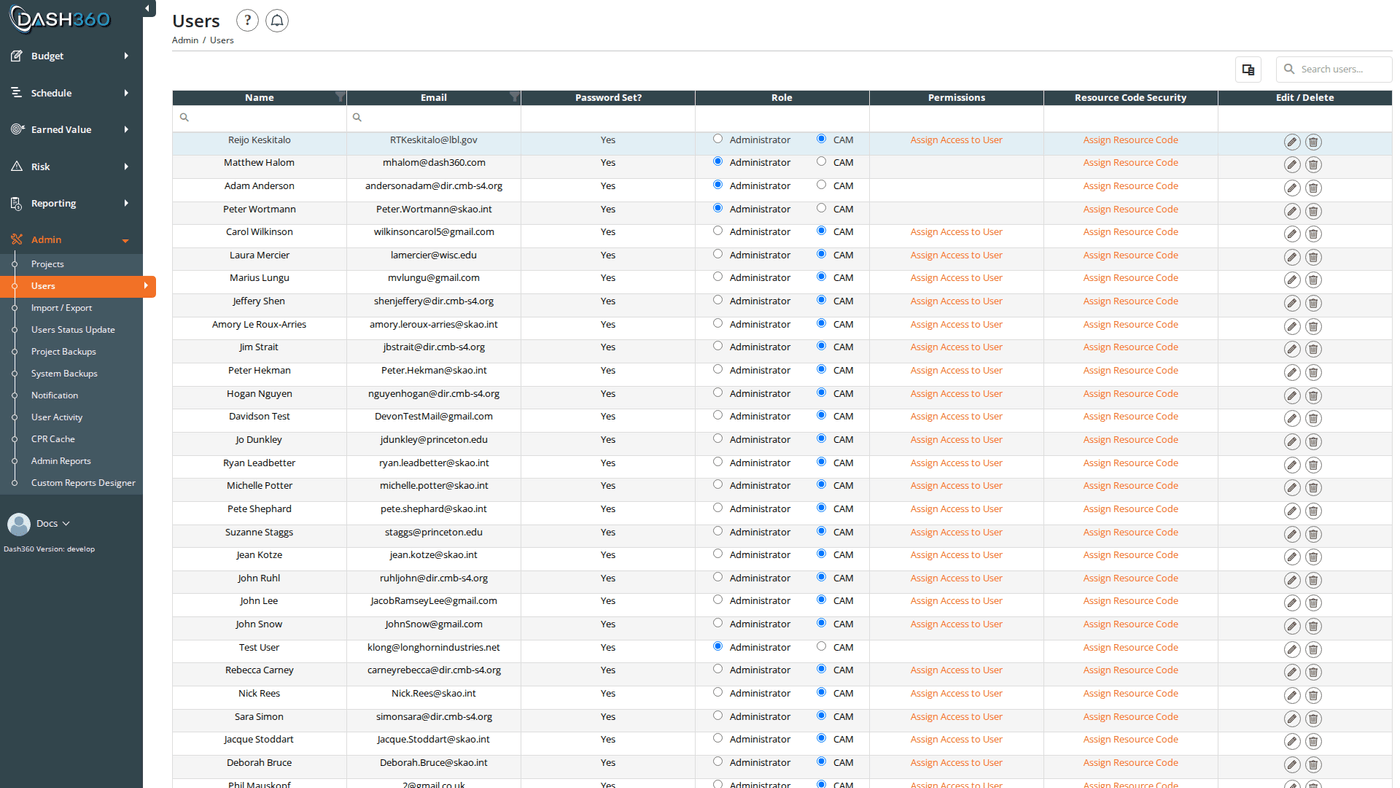
The Active tab shows a DevExpress grid with search panel, filter row, and header filters. Columns:Changing a User’s Role Inline
The Role column contains inline radio buttons; you can switch a user between Administrator and CAM directly in the grid without opening the edit modal. The change saves immediately.Adding a User
- Click Add User.
- Fill in the required fields (see User Fields below).
- Configure the password setup options.
- Click Save & Close or Save & Add Another.
User Fields
When editing an existing user, the Save & Add Another button is hidden (it only appears on the Add User form). Password fields are also hidden on edit; use the password setup options only when creating a new user or if you need to reset a password.
Editing a User
Click the Edit (pencil) icon on any active user row. The same modal opens pre-filled with the user’s current data. You can update the name, email, and Hide Account status. The Send User Email and password options are hidden in edit mode.Deactivating a User
Click the Deactivate (delete) icon on an active user row. A confirmation dialog asks:“Are you sure you want to make this user inactive? They will no longer be able to login, however, all of their data will remain in Dash360. You can reactivate them at a later date, if needed.”Confirm to move the user to the Inactive tab. Their data and history are fully preserved.
Inactive Users Grid
The Inactive tab shows a simpler grid:Reactivating a User
Click the Reactivate (approve) icon on any inactive user row. A confirmation dialog asks for confirmation before restoring access.Permanently Deleting a User
Clicking Delete on the Inactive tab opens the Delete User modal. Before deletion proceeds, Dash360 checks all data linked to this user and displays it grouped by project in an accordion:
If the user has linked data, a dropdown appears requiring you to select an active user to receive the data. Deletion cannot proceed until a replacement is chosen.
If the user has no linked data, a message confirms they are safe to delete with no reassignment needed.
After reviewing the linked data (and selecting a replacement if required), a final confirmation dialog asks for confirmation before the permanent deletion proceeds.
Work Package Permissions
By default, a CAM user can see all work packages on every project they have access to. Work package permissions let you restrict a user to specific work packages within a project. Click Assign Access to User in the Permissions column on any CAM user row to open the Access Permissions modal.Current Permissions Table
The modal displays all existing permissions for the user in a table:Adding a Permission
Use the form below the current permissions table:
Click Add Access to save the new permission entry. The permissions table refreshes immediately.
Granting access to a parent WBS element automatically grants access to all of its child WBS elements. You do not need to add separate entries for each child.
Resource Code Security
Resource code security restricts which resource codes a user can see and use within a specific project. This is useful when different CAMs own different resource pools and should not see each other’s resource assignments.The Resource Code Security column only appears on the active users grid when the
CAM-Access-To-Resource-Codes setting is enabled in the Registry. If the column is not visible, this feature is not enabled for any project.Resource Code Security Modal
The modal contains:- Project dropdown: select the project to configure resource code access for
- Resource codes list (multi-select): the resource codes available in the selected project. Pre-selected codes are the ones already assigned to the user. Select or deselect individual codes using the multi-select widget.
- Assign All / Unassign All: quick buttons to select or clear all codes at once
- Save: saves the current selection for the selected project
Resource code security only takes effect for projects where the
CAM-Access-To-Resource-Codes registry setting is enabled. If the project does not have this feature active, users see all resource codes regardless of assignments made here.History Tracking
When history tracking is enabled (via theEnableHistoryTracking registry setting), a History icon appears on each active user row. Click it to view a full audit trail of all changes to that user’s record, with timestamps and the user who made each change.