Overview
The Budget Form is the heart of the Dash360 cost estimating workflow. Select a project, WBS element, and work package to open the estimate for that work package. The form is organized into collapsible accordion sections (Details, WBS Dictionary, Resource Assignments, Schedule, CPR, Risk Factors, Potential Risks, Supporting Documents, Comments, and Signature Approvals) each of which can be expanded or collapsed independently. The form remembers which sections you had open between page loads.Selecting a Work Package (Left-Hand Filter Panel)
The left-hand filter panel is the starting point for every Budget Form session. Click the filter icon to open it. All fields cascade; selecting a project populates the WBS list, selecting a WBS populates the work package list.
Once a project, WBS, and work package are all selected, the form loads automatically.
Page Header
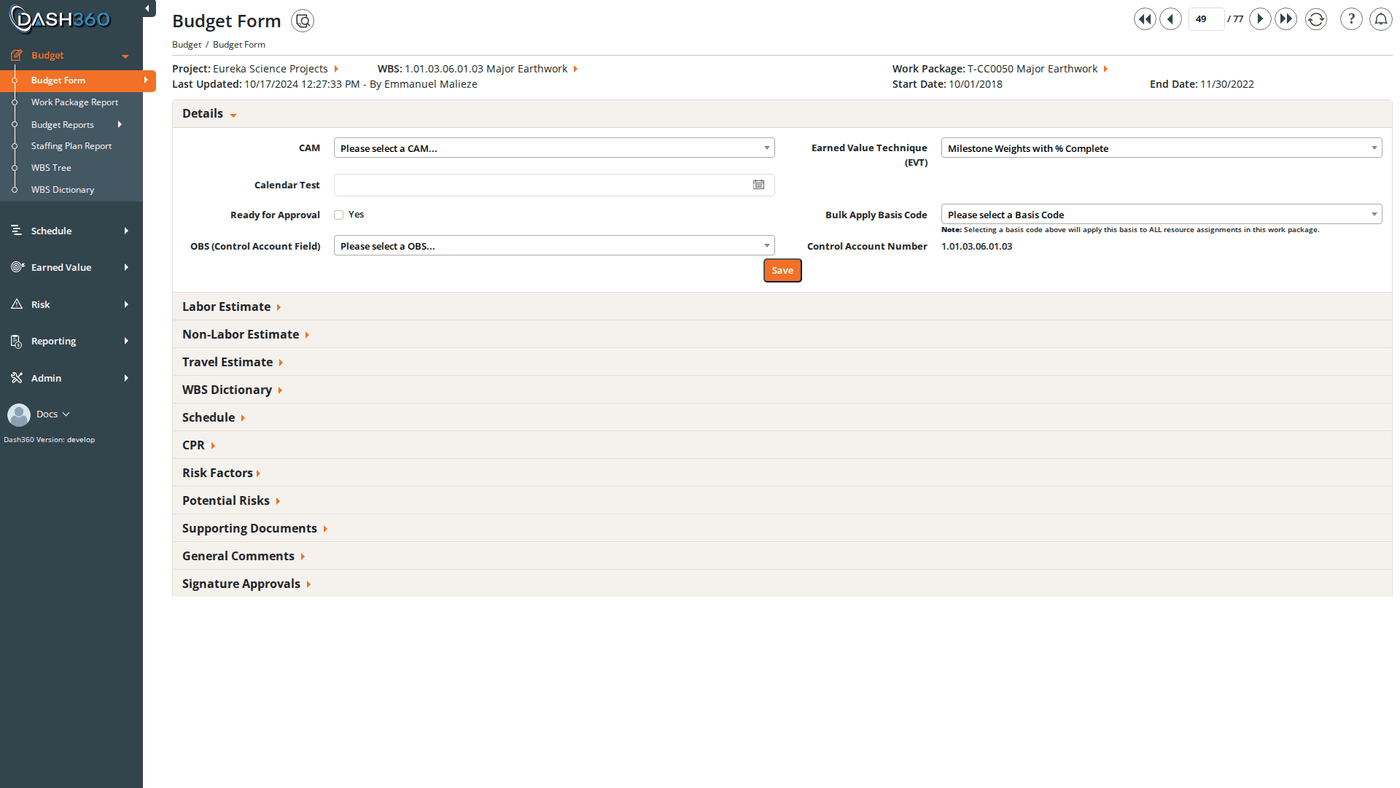
After a work package is loaded, the top of the page shows:- Work Package dates: the start and end dates of the work package
- Last Updated: the date, time, and user who last saved any part of this estimate
- Previous / Next buttons: move through work packages in sequence without returning to the filter panel. A counter shows your position (e.g., “Work Package 4 of 47”).
Details Section
The Details section captures the core metadata for this work package’s estimate. Click Save at the bottom of the section to save changes.Checking Ready for Approval disables editing of the Details section and all Resource Assignments in the Budget cost class until the estimate is either approved (completing all signature steps) or reset by an administrator.
WBS Dictionary Section
The WBS Dictionary section contains notebook entries at the WBS element level: documentation that describes the WBS element itself rather than the specific work package. This is separate from the work package-level notebook fields in the Details section.
Click Save to save WBS Dictionary entries. Changes here update the WBS element record shared by all work packages under that WBS node.
WBS Dictionary entries and their completeness are tracked in the WBS Dictionary Quality Check Report under Budget Reports.
Resource Assignments
Resource assignments are the line-item cost entries for this work package. Three grids organize assignments by type: Labor, Non-Labor, and Travel.Grid Columns
Each grid displays the following columns (some are conditional based on project registry settings):Adding a Resource Assignment
Click the Add button at the bottom of a grid to open the Add Resource Assignment modal. This is a two-step process: Step 1: Select Cost Class Choose which cost class this assignment belongs to: Budget, Baseline, Earned, or Actual. This determines which estimate line you are creating.The cost class selected in Step 1 is independent of the Cost Class filter at the top of the page. You can add a Baseline RA while viewing the Budget cost class.
Core Fields
The modal header shows the current WBS, Work Package, and Cost Class as read-only context so you always know which estimate record you are editing.
Time-Phased Grid
The time-phased grid shows one column per month from Start Date to Finish Date. Each cell holds the cost planned for that period.Notebook / Custom Fields
If your administrator has configured Resource Assignment notebook categories for this project, additional fields appear in the RA modal below the core fields. These can be text, dropdowns, rich text, or date fields; the same types available in the Details and WBS Dictionary notebook sections.Contingency at the RA Level
If the project is configured for resource assignment-level contingency (Mode 3 or Mode 4), a Contingency section appears in the RA modal below the time-phased grid. See Contingency Methodology for a full explanation of the Sanders methodology and the four configuration modes. In the RA modal, the Contingency section contains:Potential Risks (Inside RA Modal)
Each resource assignment can have its own list of potential risk items; specific risks that could affect this particular RA. Click Add Potential Risk to open the Potential Risk modal:
Potential risks appear in a grid within the RA modal. Use Edit or Delete on any row to manage them.
Supporting Documents (Inside RA Modal)
Each RA can have its own attachments separate from the work package-level Supporting Documents section.- File uploads: drag-and-drop via FilePond. Multiple files supported. Stored in S3 or local storage per your deployment configuration.
- External links: add as many Name + URL pairs as needed using Add Another Link.
Saving
Editing a Resource Assignment
Click any row in a grid, or click the Edit option in the row’s Actions menu, to open the same modal with the RA’s current values pre-filled.Deleting a Resource Assignment
Click Delete in the row’s Actions menu. A confirmation dialog appears. Confirm to permanently remove the RA and its time-phased data.Moving and Copying Resource Assignments
Use Move or Copy in the row’s Actions menu:
Both operations prompt you to select a destination project, WBS, and work package. You can also create a new work package during the move/copy if the target doesn’t exist yet.
Risk Factors (Work Package-Level Contingency)
The Risk Factors section appears between the RA grids and the Schedule section. It provides work package-level contingency using the same Sanders methodology as RA-level contingency. This section is visible only when the project is configured for WP-level or Both-mode contingency. It is hidden entirely if theCostEstimatingFormHideRiskFactors registry flag is set.
See Contingency Methodology for a full explanation of how WP-level and RA-level contingency interact, particularly in Both mode where saving here bulk-updates all RA contingency values.
Importing and Exporting Time-Phased Data
- Export: downloads the current time-phased data for the selected cost class(es) to Excel
- Import: uploads a previously exported (and edited) Excel file to update the estimate
Section Views on RA Grids
The Labor, Non-Labor, and Travel grids support Section Views; saved column configurations you can reload instantly. For example, save a view that includes the Contingency % and Contingency $ columns and set it as your default so those columns always appear without reconfiguring each session. See Section Views for full instructions.Potential Risks Section
The Potential Risks section at the form level is a work package-level list of potential risk items; distinct from the per-RA potential risks inside each RA modal. Add, edit, or delete WP-level potential risks here using the same fields (Title, Category, Type, Cost Impact, Probability, Total Cost Exposure).This section is hidden if the
CostEstimatingFormHidePotentialRisks registry flag is set for the project.Schedule Section
The Schedule section links this work package’s estimate to schedule activities for earned value measurement. Activities are shown in a grid; each row represents one activity linked to this WP.
Click Add Activity to link a new schedule activity to this work package. Assign a weight percentage to each activity to define how its progress contributes to the WP’s earned value.
The Schedule section is hidden for Earned and Actual cost classes; it only applies to Budget and Baseline estimates.
CPR Section
The CPR (Contract Performance Report) section shows an embedded earned value summary for this work package so you can check performance without navigating away from the Budget Form.
Data is grouped by CAM and WBS hierarchy. The Divisor filter set in the left-hand panel controls the display units here too. Click Export to download the CPR grid to Excel.
The CPR grid also supports Section Views. See Section Views.
Supporting Documents Section
Attach files and links at the work package level. These are separate from RA-level attachments inside each RA modal. File uploads: drag-and-drop via FilePond. Each uploaded file appears as a clickable link. Click the delete icon to remove a file. External links: add a display name and URL for each external reference (e.g., a SharePoint document, vendor portal, or specification). Click Add Another Link to add more rows. Click the delete icon to remove a link. Click Save to commit new files and links.File upload and external link visibility can be controlled independently via registry flags (
CostEstimatingFormHideInternalLinks, CostEstimatingFormHideExternalLinks). If either section is absent, it has been hidden by your administrator.Comments Section
The Comments section captures narrative context, decisions, review notes, and assumptions for this work package estimate.- Comments use a rich text editor (bold, italic, lists, links supported)
- Each comment is attributed to the user who wrote it, with a timestamp and profile image
- Users can edit or delete their own comments: click the Edit or Delete link on your comment
- Other users’ comments are read-only to you
- Comments are displayed in chronological order
This section is hidden if the
CostEstimatingFormHideGeneralComments registry flag is set for the project.Signature Approvals Section
The Signature Approvals section manages the formal cost estimate approval workflow. It has two tabs:Current Signatures
Shows the active signature steps in order. Each step has:- A checkbox showing whether this step has been signed
- The step name (e.g., “CAM Approval”, “PM Review”)
- The user assigned to this step
- After signing: the signer’s name, date, and cost at the time of signing
- The user specifically assigned to the step, OR
- Any Administrator (if the project is not locked)
- Click the checkbox for your step.
- A confirmation dialog appears. If this is Step 1, it also warns that signing will lock Budget cost class editing.
- Confirm. The step is permanently checked, the completion details appear, and Budget RA editing is locked.
Archived Signatures
Shows all previous completed signature rounds for this work package. Each time an administrator resets the signatures, the completed chain moves to the Archive tab, preserving a historical record of every approval cycle.Restarting the Signoff Process
If the estimate needs to be revised after signatures have been collected, an administrator can click Restart Signoff Process. This:- Moves all current signatures to the Archived Signatures tab
- Unlocks Budget cost class RA editing
- Unchecks the Ready for Approval checkbox
- Resets the current signature chain to Step 1
The Signature Approvals section is hidden if
CostEstimatingFormHideSignatureApprovals is set in the registry.Lock and Read-Only States
Several conditions cause the Budget Form to enter a locked or read-only state, preventing edits:
When a modal opens in a locked state, its title changes from “Add/Edit Resource Assignment” to “View Resource Assignment” and all fields are disabled.
Historical Data Protection
When the Do-Not-Change-Historical-Data registry flag is enabled for a project, the Budget Form prevents edits to past data:- Start Date cannot be set to a date before the current Reporting Period
- Finish Date cannot be set to a date before the current Reporting Period
- Time-phased grid cells for periods before the current Reporting Period are locked; you cannot edit cost values in closed periods
- Calendar date pickers automatically disable historical dates
- An error message appears if you attempt to enter a date in a locked period, showing the current Reporting Period date as the earliest allowable date