

Overview
Code files are the building blocks of project structure in Dash360. A code file is a named list of codes (either a flat list or a hierarchical tree) that gets assigned to one or more projects. Every WBS hierarchy, work package numbering scheme, activity code set, and basis code list in the system is a code file. Before you can create a project, you need code files for at least the WBS structure and work packages. Administrators create and manage code files here, then assign them to projects in Project Settings.Permissions
Administrator role required.Code File Types
Dash360 uses code files for several purposes:
The same code file infrastructure supports all of these types. The difference is in how the file is configured (hierarchical vs. flat) and where it is assigned in Project Settings.
Code File List
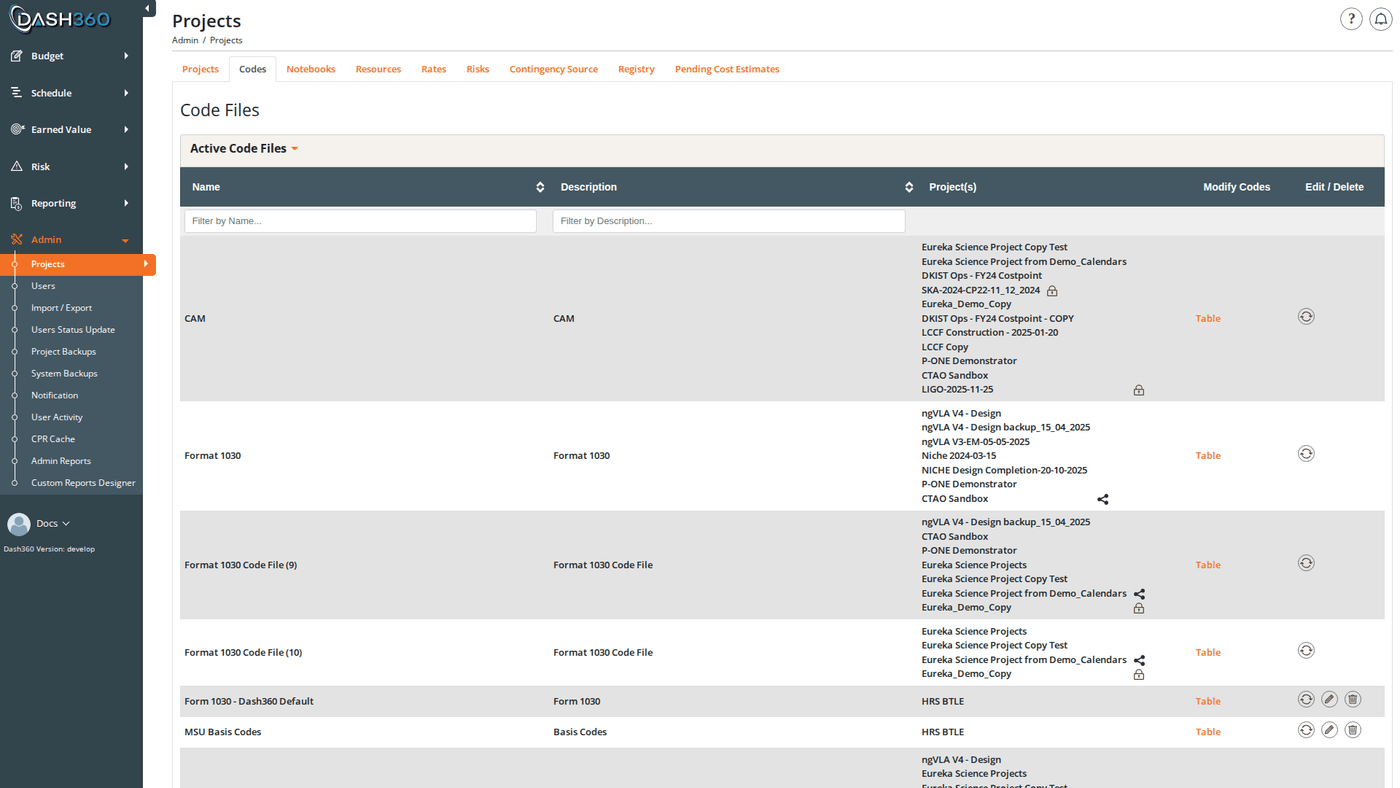
The Codes page displays all code files in two collapsible sections:- Active Code Files: files assigned to at least one active project
- Inactive Code Files: files not assigned to any active project
Status Indicators
Each code file row shows status icons on the right:Code File Fields
Creating a Code File
- Click Add Code File.
- Enter a Name (required) and optional Description.
- Set Type to Flat or Hierarchical.
- If Hierarchical, enter the Separator character (default
.). - Optionally, use the Linked Code Files dual-list selector to associate up to 10 other code files with this one. Codes in those files will be available as selectable entries when adding codes here.
- Click Save and Close or Save and Add Another.
Editing a Code File
Click the Edit (pencil) button on any code file row. Edit/delete buttons are disabled when any project using the file is locked or has locked cost classes.Copying a Code File
Click the Copy (process) icon on any code file row. Enter a name for the new file and click Copy Code File. The copy includes:- All codes and their hierarchical structure
- All code descriptions
- All linked code file associations
- All code entries (cross-references to linked files)
Deleting a Code File
Click the Delete (trash) button on a code file row. Before deletion proceeds, Dash360 shows an impact analysis listing every project and record that references this file; cost estimates, resource assignments, schedules, and notebook entries.Managing Codes
Within a code file, codes are managed through two views, selectable from the Modify Codes column in the code file list:When a code file is shared across multiple projects, the Add Code button is hidden. To add codes to a shared file, use the Table or Tree view directly. This prevents accidental structural changes that would affect all sharing projects without review.
Table View; Code Fields
The Entries column in the table grid shows which codes from linked files are associated with each code. Format: Linked File Name: Entry Code + Description.
Adding a Code
- Click Add Code.
- Enter the Code value and Description.
- If the file is hierarchical, select a Parent code (or leave blank for a root-level code).
- If the file has linked code files, use the entry dropdowns to associate codes from each linked file.
- Click Save and Close or Save and Add Another.
Editing a Code
Click the Edit icon on any code row. The same modal opens pre-filled with the current values.Deleting a Code
Click the Delete icon on a code row. If the code has child codes or is referenced in project data, a confirmation modal lists all affected records grouped by project. Child codes are deleted along with the parent.Bulk Operations
Tree View (Hierarchical Files Only)
The Tree view renders the code hierarchy as an interactive D3 diagram with parent-child relationships shown visually.Tree Interactions
Tree Toolbar
Code Linking
Code files can be linked to other code files. Linking is configured on the code file (not the individual codes) using the Linked Code Files field when creating or editing the file. When file A links to file B:- Each code in file A gets a dropdown selector to reference a code from file B
- This cross-reference appears in the Entries column of file A’s table view
- The relationship enables filtering and grouping; for example, filtering work packages by WBS element
- WBS Code File → Work Package Code File (link WBS nodes to their work packages)
- Work Package Code File → Activity Code File (link work packages to scheduled activities)
Code History
When history tracking is enabled (controlled by theEnableHistoryTracking registry setting), a History icon appears on each code file row. Click it to open a full audit trail showing every change made to the code file and all of its codes (creations, edits, deletions, link changes, and entry changes) with timestamps and the user who made each change.
Shared Code Files
A single code file can be assigned to multiple projects. When a code file is shared:- The Shared icon appears on the code file row
- Any change to a code (add, edit, delete, reorder) affects every project using that file
- The Add Code button is hidden as a guard against accidental edits; use Table or Tree view to make changes
If you need to modify codes for one project without affecting others, copy the code file first to create a project-specific version, then reassign the project to use the copy in Project Settings.